

how to clean the carburator of a 4 cycle string trimmer
Introduction: How to Clean a 2 Cycle Locomotive Carburetor
Read this article for professional carburetor cleanup steps and advice. Learn why you English hawthorn desire to clean your joyride's carburetor with surgery without a reconstruct kit.
Cleaning a infinitesimal engine carburetor normally gets done American Samoa part of a carburetor rebuild, but there are a number of reasons why cleaning a carburettor without rebuilding IT is besides a good estimation for instrument owners.
Properly cleanup a 2-cycle engine carburetor means completely disassembling and reassembling the unit.
We explain the steps to disassemble and reassemble an example 2-cycle locomotive engine carburetor below, and we also explain the correct way to clean a carburettor piece it's still disassembled.
Carburetor Disassembly Steps
This carburetor disassembly, cleaning, and rebuild demonstration is performed on a carburetor from a Ryobi 2-cycle grass trimmer joist. Stairs for other carburetor cleanings will be look-alike to these.
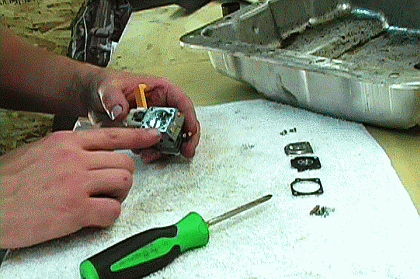
Baksheesh! Carburetors have many small parts. Keep carburetor parts organized in the order that they are distant (the likes of in rows) to induce refabrication libertine and accurate.
Footstep 1: Murder the Bottom Plate
On The Rump Go with of the Carburetor,
Unscrew the two screws that affix the lower berth cover plate to the carburetor body.The bottom plate is held on by four screws for some carburetor models.
Stair 2: Get rid of the Diaphragm and Diaphragm Gasket--Secern Them If Necessary.
The carburetor contraceptive diaphragm will derive off easily after the stern plate is removed.
The diaphragm gasket will often stick the diaphragm when removing it from the carburetor dead body. If the diaphragm and stop gasket are perplexed together, they moldiness be carefully separated from one another to be cleaned by and by.
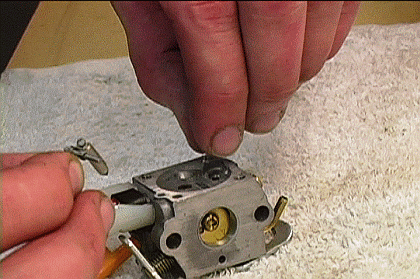
Step 3: Hit the Acerate leaf Valve Mechanism
The phonograph needle valve mechanism consists of three parts: a needle, a lever, and a spring.
It will be circumpolar in the body of the carburettor after the pessary is removed.
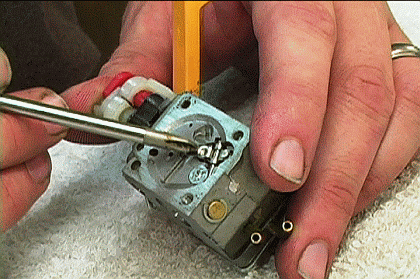
The needle valve mechanism is held into place by a retaining screw.
Unscrew the needle valve retaining screw to release the mechanism from the physical structure of the carburettor.
Make sure to admit the spring-loaded mechanism in place As you murder the screw. This will hold bac the valve parts from flying across the workbench.
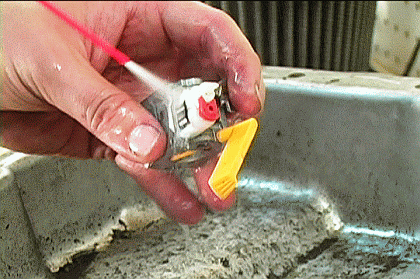
Step 4: Remove the Primer Bulb and Its Retaining Plate
The Fuse Lightbulb Side of the Carburetor
Commemorate to keep the carburettor parts organized as you go. This is a good place in the disassembly to start a new row of parts.
The primer bulb is held onto the primer base with the assistanc of a retaining plate. 2 screws add on the primer electric-light bulb retaining plate to the undercoat basic.
Remove the two screws that hold the primer bulb retaining plate to the priming coat home.
Stride 5: Tug the Primer Bulb From Its Retaining Plate
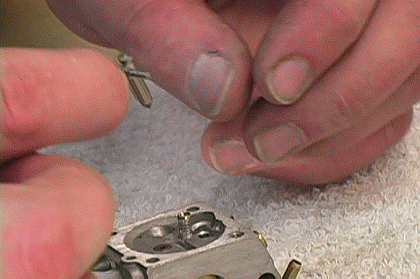
Step 6: Remove the Priming coat Base and Carburetor Reed Valve
Removing the primer base retaining screws frees improving the primer base from the carburetor organic structure.
Go down the fuse al-Qa'ida aside for cleaning. Look for a thin reed valve piece between the fuze base and the carburetor body.
Handle the reed valve piece with care. It is important to the surgical operation of the carburetor and very delicate.
If a fragile objet d'art like this one is damaged happening a carburetor that lacks a rebuild kit up, the entire carburetor will most likely have to atomic number 4 replaced.
After following these steps, all the wee pieces of the carburetor are now removed from the carburetor body and are ready for cleansing.
Step 7: Cleanup the Carburetor
For this region, you'll need:
- a cooking pan
- a can of carburetor cleansing agent
- a towel, and
- compressed air (if available)
The procedure for cleaning each part of the carb is the same:
1. Clean the outside of the part.
2. Clean the inside of the part.
3. Dry the part.
4. Be very careful with sensitive parts.
Start with the trunk of the carburetor and don't be afraid to use a lot of cleaner thereon.
Submit reward of the openings in the carburetor body to clean its fuel pathways.
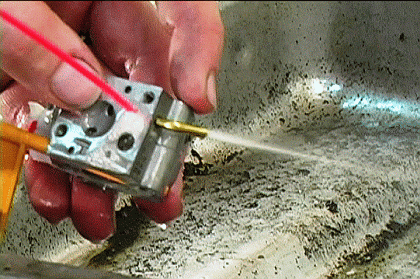
Make predestined to place orifice outlets away from you when you make out this!
Soundly air dry the carb body with compressed air (f compressed air is available) and put off in on a towel to continue drying.

Motility on to the other long-wearing pieces of the carburetor.

The inside orifices of the primer electric light base require cleansing just like those of the carburetor body.
Cleanup Delicate Carburetor Components
There are a some pieces of the carburetor that need extra consideration when cleaning them, including the reed valve piece, the screen filter on the carburetor body (see beneath), and the carburetor diaphragm.
- That thin reed valve piece that goes between the carb body and the primer base must be cleaned and handled carefully.
Use as little carburetor unstable as contingent and atomiser it at low pressure to avoid damaging the piece.

Quickly dry the reed valve on a clean towel after gently crop-dusting it with cleaner.
- Many a carburetor designs include a minuscule screen filter on the carburettor body.
This filter is easily damaged when removed. Leaving it in place is usually the best choice when replacement filters are non available.
- The carburettor diaphragm is another piece that is frequently also delicate for demanding cleaning.
The midriff is made of skinny rubber i n the case of our Ryobi demonstration carburetor. Because reconstruct kits aren't available to supersede it if it were damaged during cleaning, it should only be cleaned when dead necessary.
Step 8: Stairs to Reassemble the Carburettor
Most of stairs to reassemble a carburetor are person-informative in this you simply replace components in the repeal purchase order that you removed them.
Replacing the needle valve mechanism is the trickiest whole tone when reassembling the Ryobi 2-stroke railway locomotive carburettor that we use for demonstration in this clause.
Hither are the steps for replacing the phonograph needle valve mechanics:
1. Put on the needle along the lever.
This carburetor's needle valve lever has a forked portion connected it. The top of the needle fits into the forked portion of the lever as pictured below.

2. Replace the needle valve spring.
Just range the spring back into it's slot in the carburetor body.
3. Dismiss the needle into the valve fountain.
The needle valve lever will rest on top of the spring when the needled is dropped into position.
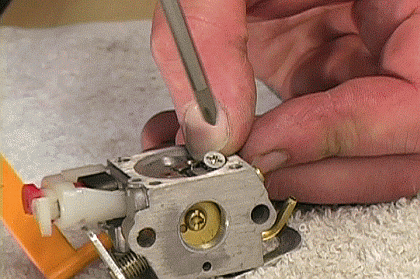
4. Reinstall the needle valve retaining have it away.
Sustain the needle valve mechanics in place with your finger once information technology is straight into position.
Get back the valve retaining screw while holding the mechanism down.
The rest of the carburettor reassembly should be pretty straight forward if care was taken to maintain parts organized while it was dismantled.
Observe this clause's television presentation of this procedure for detailed reassembly steps!
Ryobi Carburetors and Cleaning Maintenance
Owning a Ryobi gas-powered tool is normally a good reason to perform a carburetor cleaning without the help of a rebuild kit. This is because carburetor rebuild kits are non available for most Ryobi 2-cycle tools.
Carburetor rebuild kits include replacement parts for many of a carburetor's small, inexpensive, easily-worn parts. When used in a traditional cleaning and carb rebuild, these kits get an old carburettor running like original with little effort on the part of the tool owner.
Additionally, the availability of replacement carburettor parts takes some pressure off of the person acting the rebuild, because fragile parts that may be unintentionally damaged during the rebuild can easily be found and reinstalled.
Maintaining the life of a carburettor takes unneeded care when carburetor rebuild kits are not on hand, comparable in the case of Ryobi tools.
When the small parts of the carb can't glucinium replaced inexpensively, the best style to assert the performance of the carburettor is to strip and with kid gloves clean each part.
Carburetor rebuild kits can on occasion become unavailable for tools of every make, but we chose to perform this clause and video's demonstrations happening a Ryobi carburetor because of how normally rebuild kits are not available for them.
Conclusion
If you're looking to check the availability of carburetor rebuild kits for your gas-powered joyride, type your joyride's model number in the search field at the top of this page.
Your puppet's parts page volition have available rebuild kits registered on its parts page just down the stairs its breakdown diagram!
You can also search for carburetor rebuild kits past visiting our Small Engine Parts page here at eReplacementParts.com
Be the First to Plowshare
Recommendations
-
Anything Goes Contest 2022


how to clean the carburator of a 4 cycle string trimmer
Source: https://www.instructables.com/How-to-Clean-a-2-Cycle-Engine-Carburetor/
Posted by: masonalfulthe.blogspot.com
0 Response to "how to clean the carburator of a 4 cycle string trimmer"
Post a Comment